CH12: Logical and Manual Examinations
Introduction
The preceding chapters built a comprehensive foundation: Chapter 6 introduced the acquisition hierarchy and defined manual, logical, file system, and physical methods. Chapters 9 and 10 explored the Android ecosystem, covering file systems, evidence artifacts, applications, and security models. Chapter 11 did the same for iOS. Students now understand what data exists, where it lives, and what each acquisition method theoretically recovers.
This chapter addresses what happens when theory meets the lab bench.
Forensic acquisition rarely proceeds as textbooks describe. Cables fail. Trust prompts never appear. Tools crash mid-extraction. A device that was unlocked in the field arrives at the lab locked. An extraction completes but is missing half the expected data. These failures are not exceptions; they are the daily reality of a working forensic examiner. The difference between a competent examiner and an exceptional one is not which button they press to start an extraction. It is what they do when the extraction fails, how they diagnose the problem, and how they document everything along the way.
This chapter walks through the practical execution of manual and logical examinations, catalogs the most common failure points, provides structured troubleshooting approaches, and establishes a decision framework for recognizing when a logical extraction is insufficient and escalation is warranted.
Learning Objectives
By the end of this chapter, you will be able to:
- Execute a documented manual examination using photography and screen recording, and identify scenarios where manual examination is the only viable option.
- Perform a logical acquisition on both Android and iOS devices, following a documented workflow that maintains forensic integrity.
- Diagnose and resolve common extraction failures including connection issues, trust/pairing problems, driver conflicts, and partial extractions.
- Recognize when a logical extraction is insufficient and articulate the justification for escalating to file system or advanced methods.
- Apply a structured troubleshooting methodology that maintains forensic documentation while maximizing data recovery.
12.1 The Manual Examination in Practice
Chapter 6 defined manual acquisition and established its position at the base of the forensics pyramid. This section focuses on the practical execution: how to conduct a thorough manual examination, what to document, and the situations where manual examination is not just a fallback but the correct choice.
When Manual Is the Right Choice
Manual examination is often perceived as the "last resort" method, but there are scenarios where it is the primary or only viable approach:
- Unsupported devices. A prepaid feature phone from 2012, a children's tablet running a custom Android fork, a point-of-sale terminal, or a smartwatch with no USB data interface. If no forensic tool recognizes the device, manual examination may be the only path to evidence.
- Severe physical damage. The USB port is destroyed, but the screen still responds to touch. The device cannot maintain a cable connection, but it is powered on and displaying data.
- Consent-limited scope. In some investigations, particularly corporate HR matters and civil litigation, the legal authorization may specify a "visual review" rather than a full data extraction. The examiner is permitted to look at and photograph specific content but not to create a forensic copy of the device.
- Time-critical triage. A missing persons case or active threat scenario where the investigator needs to check recent calls and messages immediately, before a full extraction can be set up.
- Validation. Using manual observation to confirm that a tool-generated report accurately reflects what appears on the device screen. This is a fundamental validation technique introduced in Chapter 1.
Documentation Standards
A manual examination is only as good as its documentation. Every observation must be captured in a format that is reproducible and court-admissible.
Photography:
- Use a dedicated forensic camera or a department-issued device. Never use your personal phone.
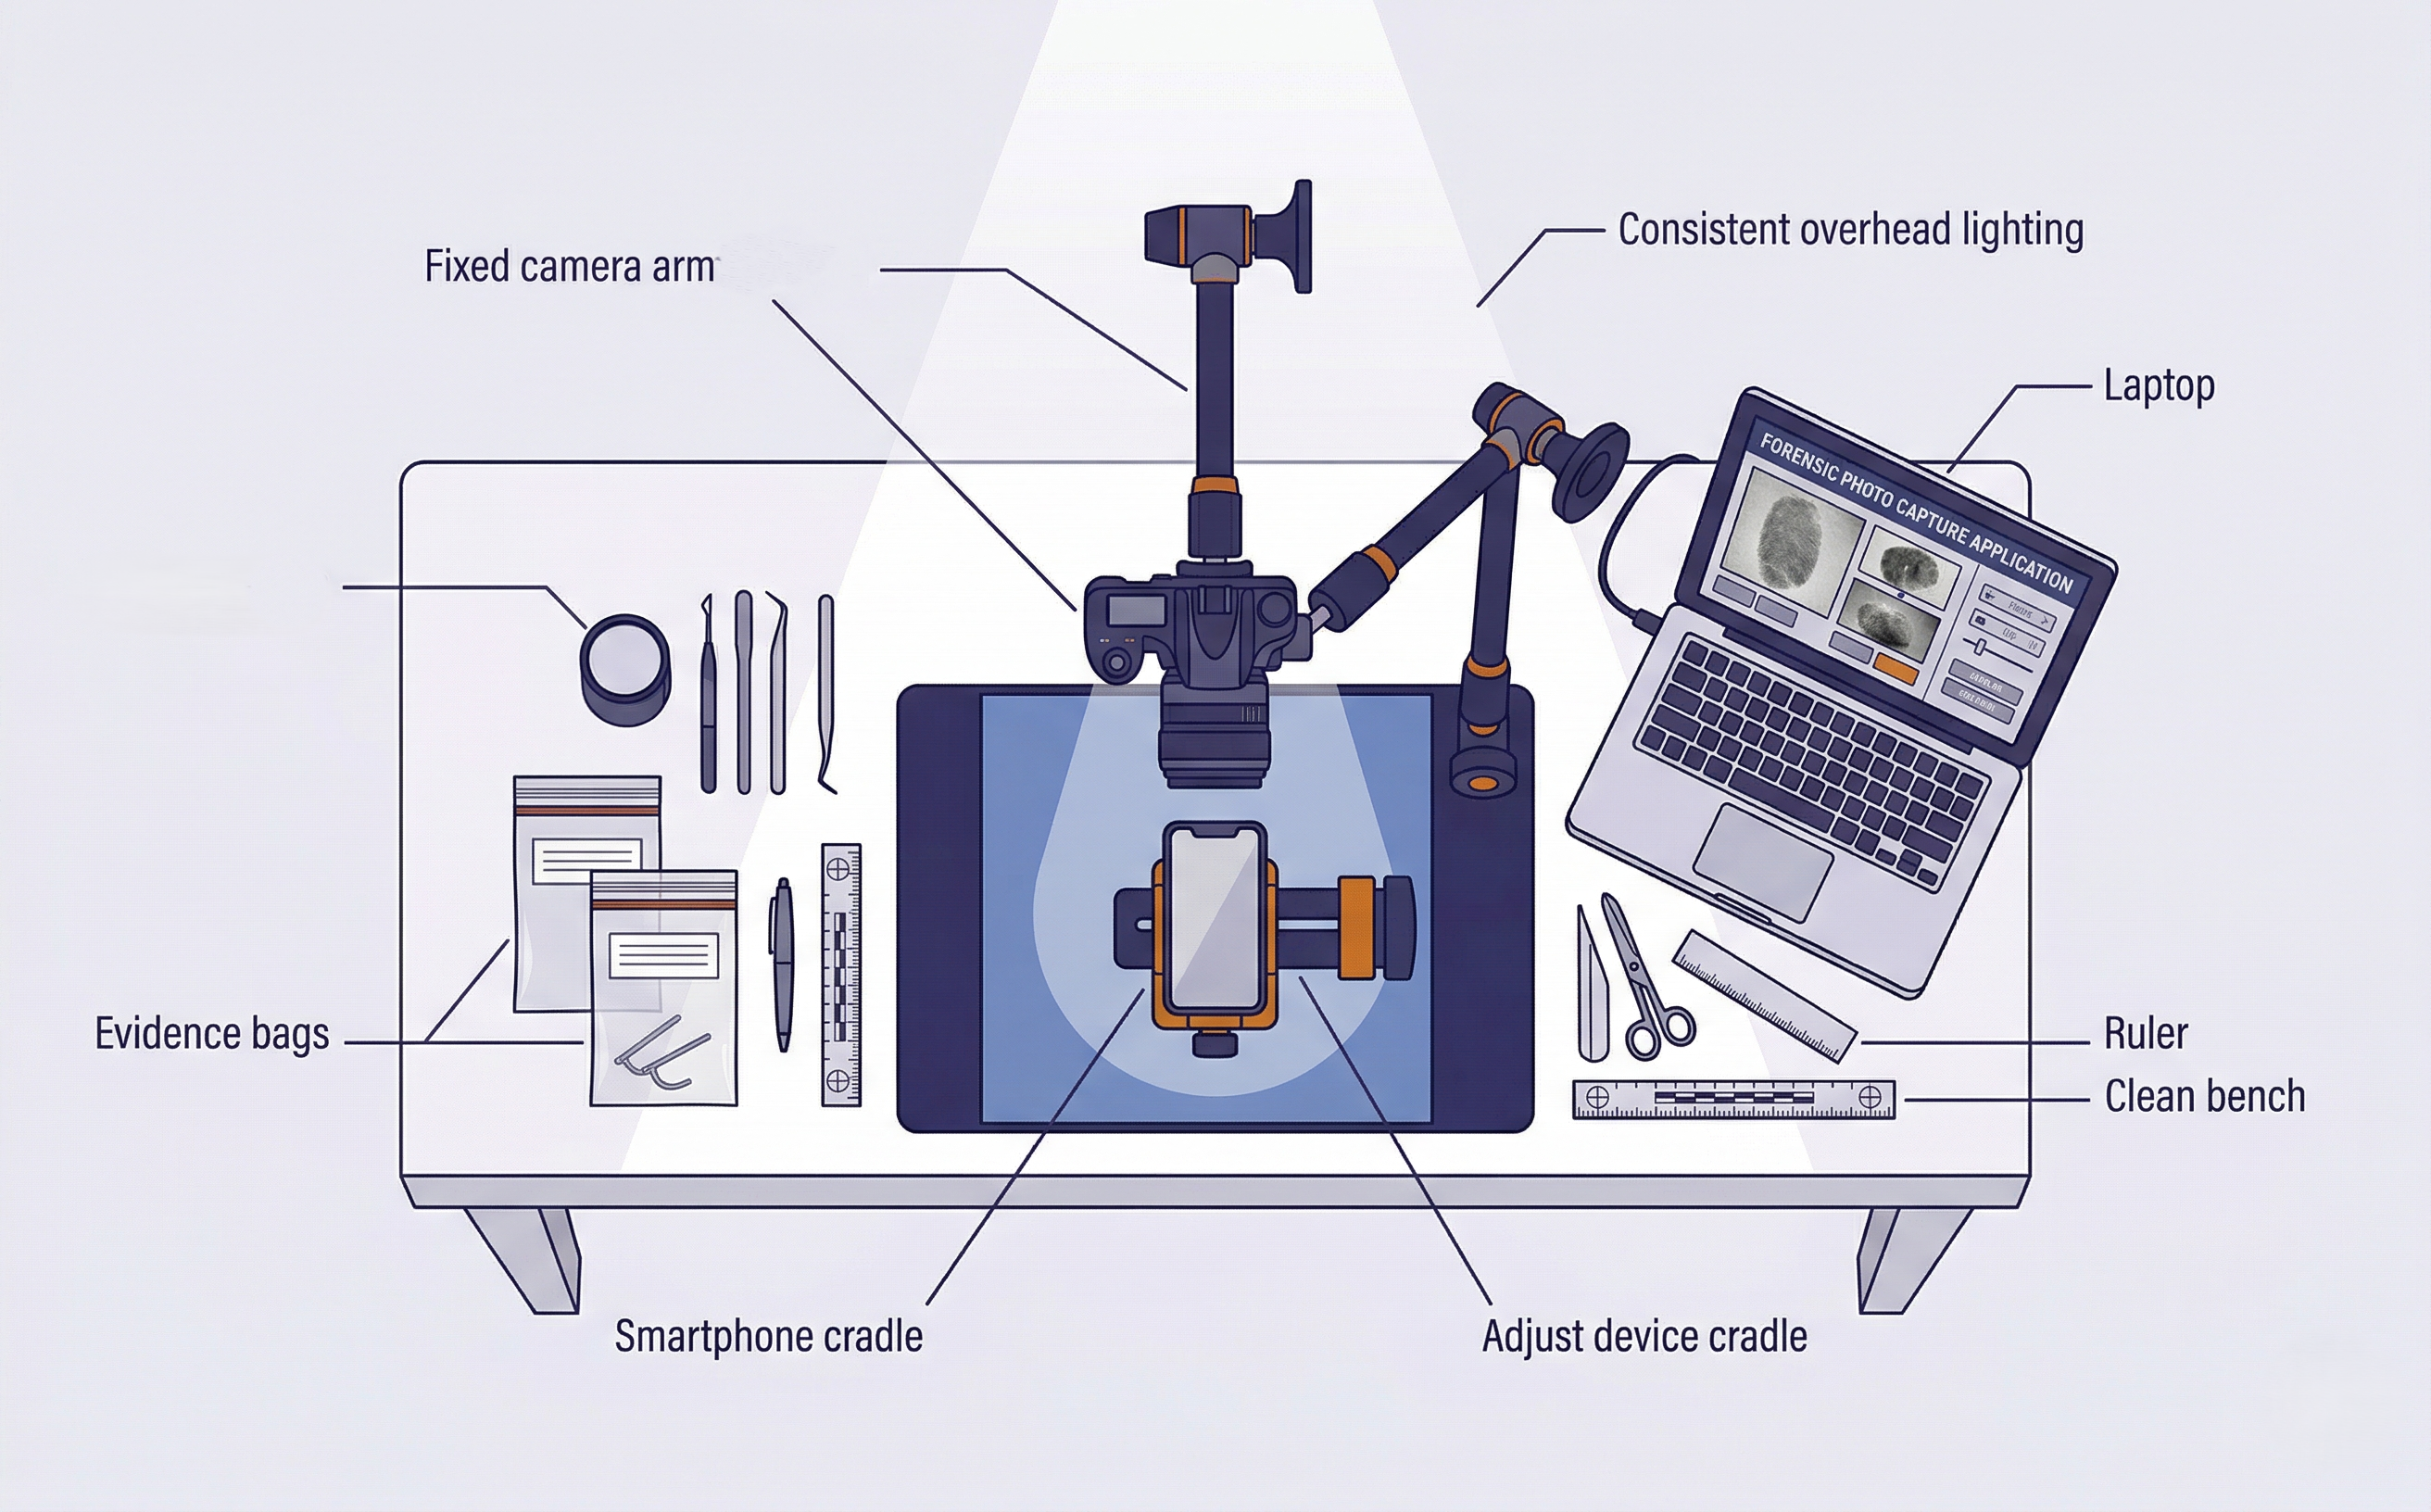
- Position the evidence device in a professional forensic mounting system. Purpose-built systems like the Fernico ZRT3 provide a fixed camera mount, adjustable device cradle, consistent lighting, and glare-free capture environment. The ZRT3 and similar platforms are designed specifically for manual mobile forensic examinations. They hold the device securely, eliminate camera shake, and produce consistent, court-quality images across an entire examination session. If a dedicated mounting system is not available, a standard document photography stand with adjustable lighting is an acceptable alternative, though it requires more manual adjustment to maintain consistency.
- Capture the full screen in every photo, including the status bar. The status bar contains the current time, network status, battery level, and signal strength, all of which are forensically relevant because they establish the device's state at the moment of examination.
- Use overlapping photos for scrolling content. If a message thread spans 30 screens of text, you capture 30+ overlapping photos so that no message falls between frames.
- Avoid glare. Adjust lighting angle or use a matte screen protector if the device screen creates reflections. Professional mounting systems like the ZRT3 include diffused lighting that eliminates most glare issues automatically.
Video Recording:
For dynamic content (scrolling through long conversations, navigating complex app interfaces, or documenting the path taken to reach a specific screen), video recording with audio narration provides context that still photos cannot. The examiner narrates each action: "I am now opening the Messages application. I am selecting the conversation with the contact labeled 'Mike.' I am scrolling to the earliest messages in this thread."
Examiner Notes:
Maintain a contemporaneous written log documenting the time each observation was made, what was viewed, and the order of navigation. These notes form the basis of the examination section of the court-ready report (Chapter 3).
Analyst Perspective
In private-sector investigations, particularly employee misconduct cases involving corporate-owned devices, a manual examination may be all you are authorized to perform. The employee's legal counsel may agree to a "visual review and photography" but not a full forensic extraction. Knowing how to conduct a thorough, court-defensible manual examination is a distinct professional skill that separates forensic examiners from IT staff.
Examining Locked Devices Manually
Even on a locked device, certain information is visible without entering the passcode:
- iOS: The lock screen may display notification previews (if the user has not disabled them), the Medical ID (accessible via the Emergency screen), and the device model on the "Hello" screen after a fresh reset.
- Android: Depending on the device and configuration, the lock screen may show notification content, owner information (if configured in Settings > Security > Lock Screen Message), and emergency contact information.
In missing persons or welfare check cases, this lock-screen information alone may provide critical leads. A notification from a messaging app showing the last person who contacted the device owner, or emergency contact information identifying a family member, could direct the investigation forward.
Limitations to Acknowledge
Manual examination recovers only what the examiner navigates to and photographs. If you do not open a specific folder, message thread, or application, you do not know what is inside. There is no way to recover deleted content through manual examination, and the resulting photos are not text-searchable without OCR processing. For these reasons, manual examination should be supplemented with a logical or file system extraction whenever possible. When it cannot be supplemented, these limitations must be explicitly documented in the report.
12.2 Logical Acquisition: The Practical Workflow
Chapter 6 explained what logical acquisition is and what data it recovers. This section provides the step-by-step workflow an examiner follows in the lab, with emphasis on the documentation and decision points at each stage.
Network Isolation Reminder
Before beginning any extraction, confirm that the device is network-isolated. Place the device in airplane mode (if you have screen access) or use a Faraday bag or enclosure to block all wireless signals. Network isolation prevents remote wipe commands, incoming messages that alter timestamps, and cloud-sync activity that could change the data on the device during examination. Network isolation procedures were covered in detail in Chapter 7. This step should already be complete before the device reaches the lab bench, but always verify.
Android Logical Workflow
- Device identification. Record the make, model, Android version, build number, and security patch level. Use the device's Settings > About Phone screen and photograph it. If the device is accessible via ADB,
adb shell getpropprovides all of this programmatically (Chapter 9). - Security state assessment. Is USB Debugging enabled? Is the device unlocked? Is there an active MDM profile? Is the bootloader locked or unlocked? Each of these factors determines which acquisition paths are available.
- Connection and trust. Connect via USB. If USB Debugging is enabled, the device should prompt "Allow USB Debugging?" Accept the prompt on the device. If using a commercial tool, follow its connection wizard. Document the trust confirmation with a photograph.
- Tool selection. Select the appropriate acquisition profile in your forensic tool. For a logical extraction, most tools offer "Logical" or "Advanced Logical" options. If using ADB directly, the relevant commands were covered in Chapter 9.
- Extraction initiation. Start the extraction. Document the start time in your notes. Monitor the progress indicator for errors, stalls, or unexpected prompts on the device screen.
- Completion and verification. When the extraction completes, record the end time, the reported file count, and any warnings or errors the tool logged. Immediately generate hash values (SHA-256) of the extraction output.
- Extraction log preservation. Save the tool's extraction log file separately. This log documents the exact tool version, device serial number, connection timestamps, and any errors, all of which may be needed for court testimony.
- Chain of custody update. Update the chain of custody log to reflect that the device was connected to the forensic workstation, the extraction was performed, and the device was disconnected. Include the workstation identifier, the examiner's name, and the start/end timestamps. Chain of custody documentation requirements were established in Chapter 3.
iOS Logical Workflow
- Device identification. Record the model, iOS version, and UDID. If accessible, use
ideviceinfo(Chapter 11). Photograph the Settings > General > About screen. - Pairing status. Has this device been paired with the forensic workstation before? If not, the device must be unlocked to accept the trust prompt. Check for existing pairing records if you also have access to the suspect's personal computer (Chapter 11).
- Backup encryption decision. Check whether an existing backup password is set. If yes, you need the password to proceed, or you can reset it from the unlocked device. On iOS 11 and later, navigate to Settings > General > Transfer or Reset iPhone > Reset > Reset All Settings. On iOS versions prior to 11, the path is Settings > General > Reset > Reset All Settings. Always prefer an encrypted backup for the reasons detailed in Chapter 11: encrypted backups include the Keychain, Health data, and complete call history that unencrypted backups exclude.
- USB Restricted Mode awareness. If the device has been locked for more than one hour without a trusted USB connection, data transfer is blocked. The device must be unlocked before proceeding. This is the tightest extraction window in mobile forensics.
- Tool selection and extraction. Initiate the backup using your forensic tool or
idevicebackup2 backup --full <path>. Monitor for disconnection, error prompts, or the device requesting the passcode mid-backup. - Completion, hashing, and log preservation. Same documentation standards as Android.
- Chain of custody update. Same chain of custody logging requirements as the Android workflow above. Every state change of the device must be reflected in the custody log.
Warning
On both platforms, never assume an extraction succeeded just because the tool said "Complete." A tool may report completion even when significant data categories are empty. Always perform a quick verification: open the extraction in ALEAPP or iLEAPP and check artifact counts against what you would expect from a device of that usage level. A smartphone used daily for a year should have thousands of messages. If your extraction shows 15, something went wrong.
12.3 Troubleshooting Connection Failures
Connection failures are the single most common problem in mobile forensics. The device is sitting on the bench, the cable is plugged in, and nothing happens. This section catalogs the most frequent failure modes and their resolutions, organized by platform.
Android Connection Issues
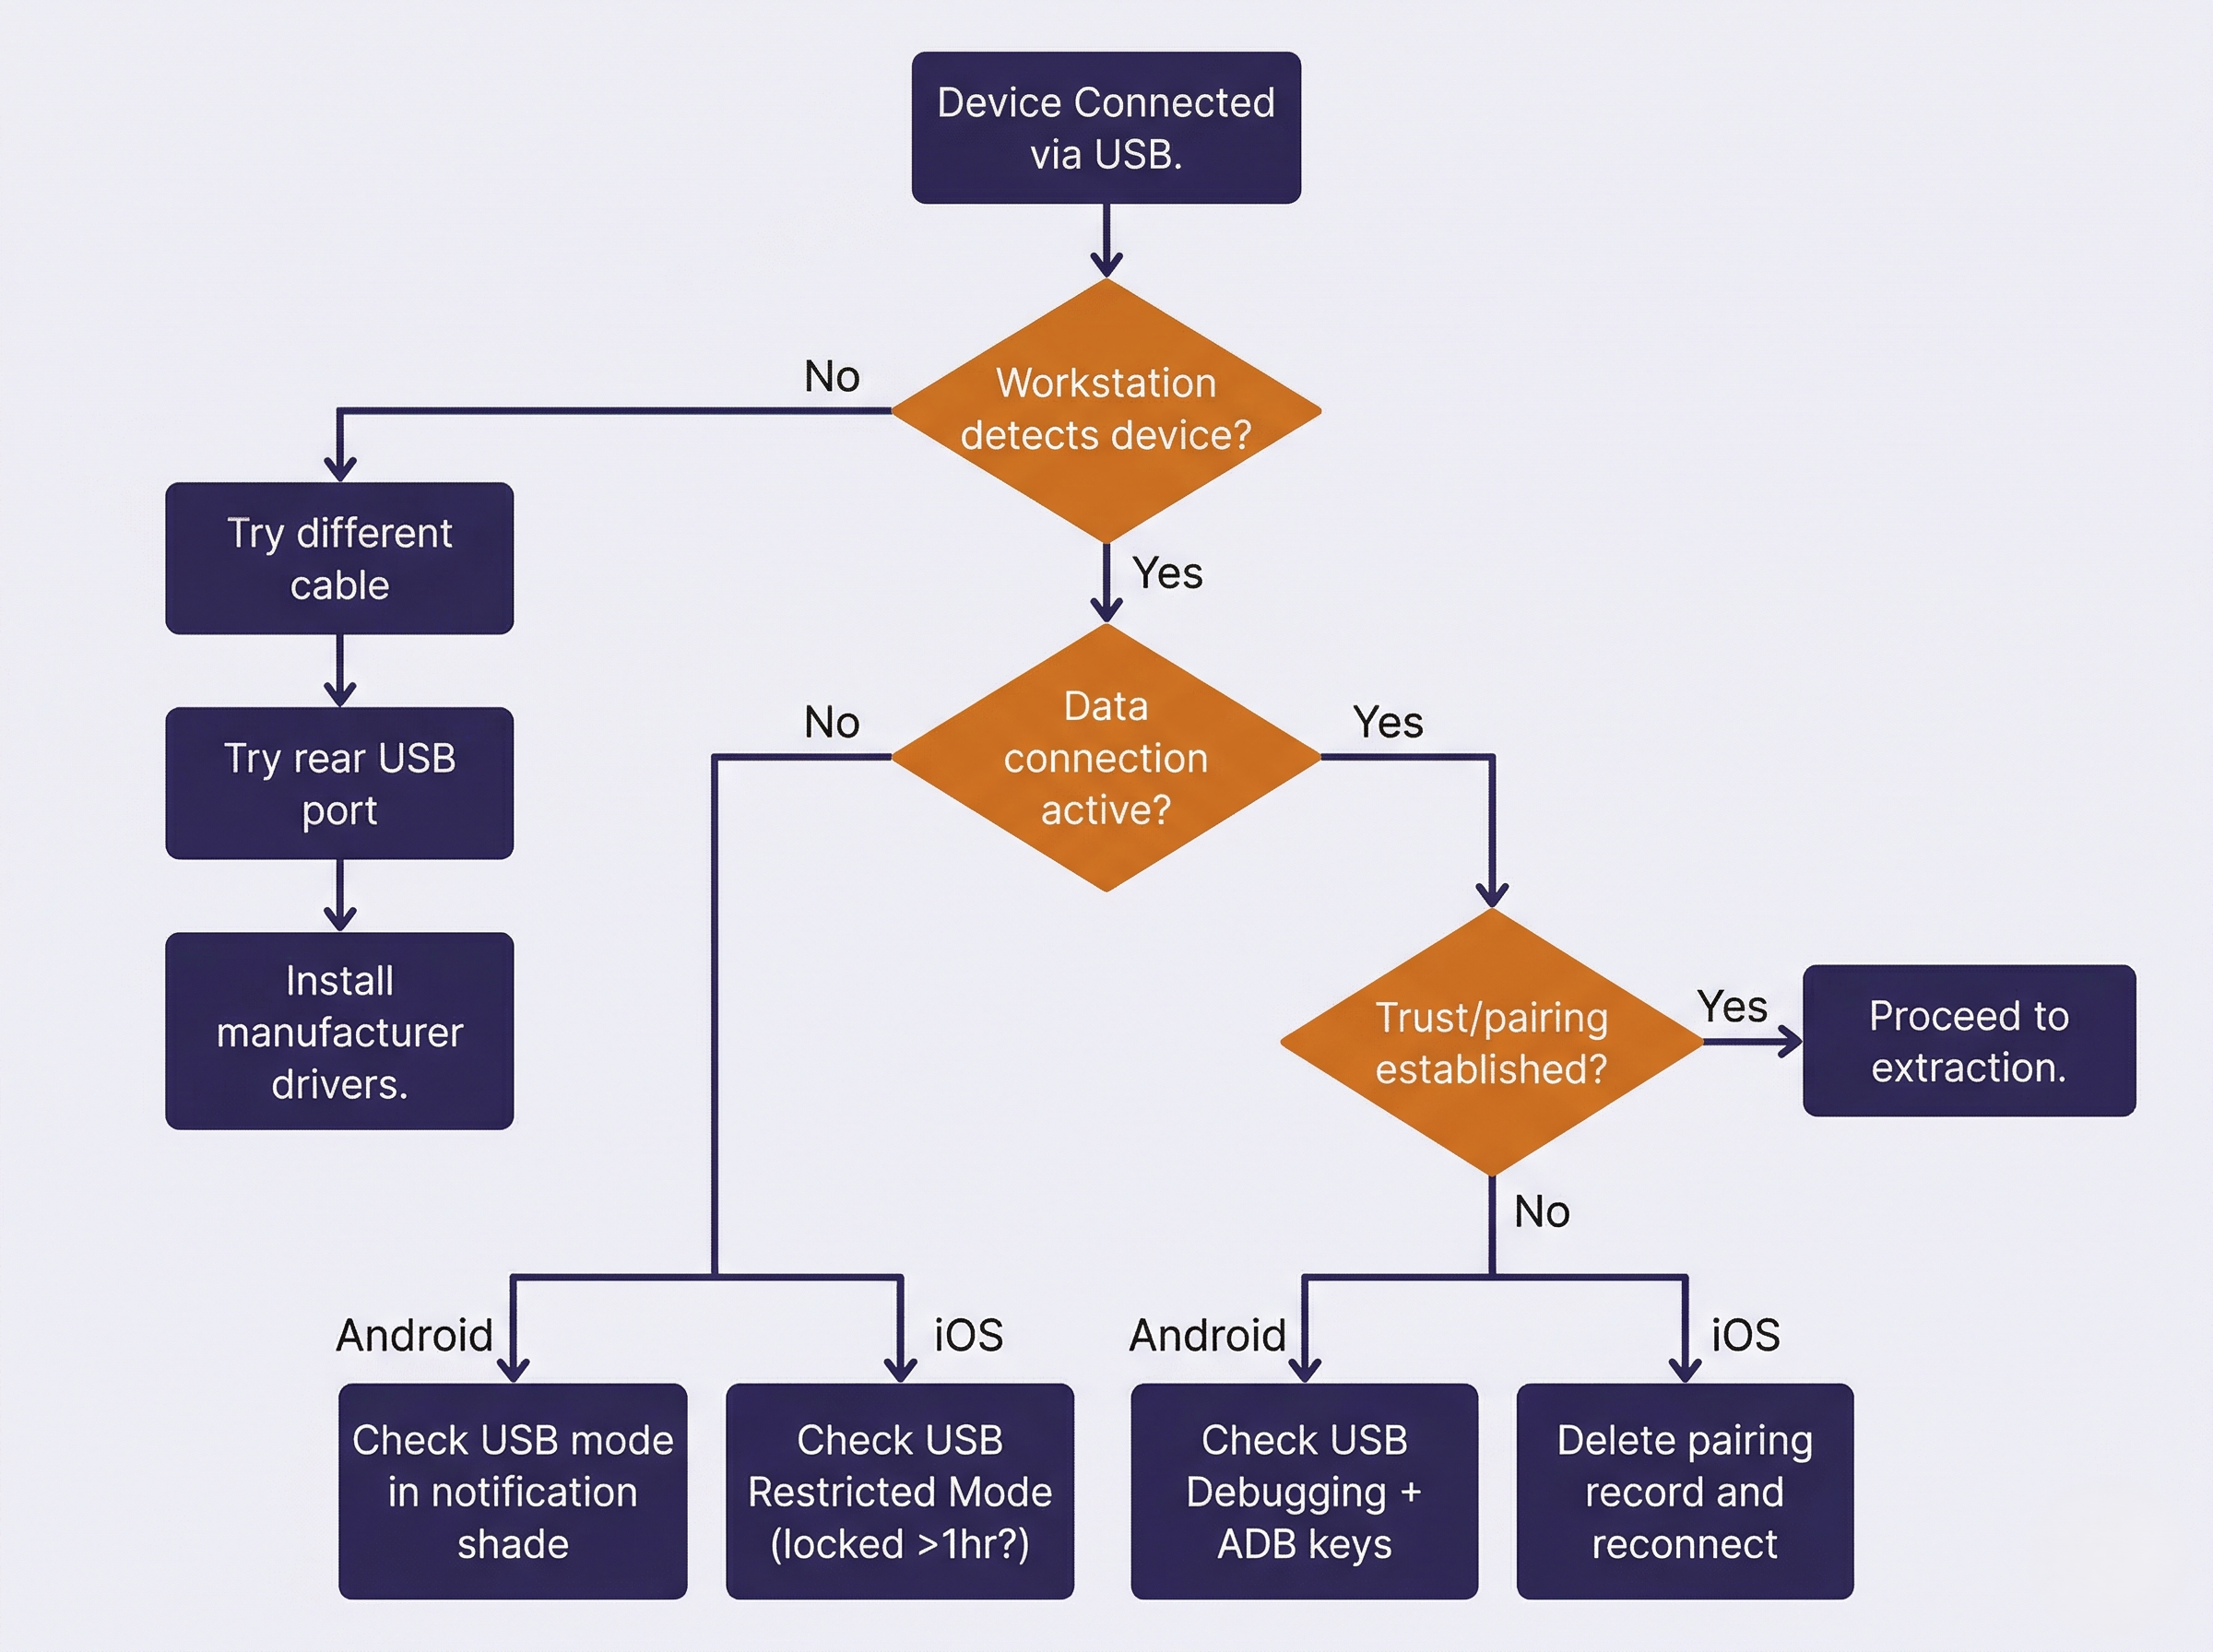
Device not recognized by workstation.
The forensic workstation does not detect the device at all. There is no USB sound, no device listing in Device Manager (Windows) or lsusb (Linux), and no response from adb devices.
- Cable quality. This is the most common cause. Use a high-quality, data-capable USB cable. Many cheap cables are charge-only and carry no data lines. Always test with a known-good cable before troubleshooting further.
- USB port selection. Connect directly to a rear motherboard USB port, not a front panel or hub. USB hubs introduce signal degradation and power delivery issues that cause intermittent connections.
- Driver installation. Windows requires manufacturer-specific USB drivers for many Android devices. Samsung devices need Samsung USB drivers. Google Pixel devices need Google USB drivers. If the device appears as an "Unknown Device" in Device Manager, install the correct driver package.
- USB mode. Android defaults to "Charging Only" mode on many devices when connected to an unknown computer. If you have screen access, pull down the notification shade and change the USB mode to "File Transfer (MTP)" or "PTP." Some forensic tools require MTP mode; others work in PTP or even charging mode depending on their extraction method.
USB Debugging not enabled and device is locked. This is one of the most frustrating scenarios. The device is locked, you do not have the passcode, and USB Debugging was never enabled by the user.
- Check the suspect's computer. If you have legal authority to search the suspect's personal computer, check for existing ADB authorization keys. On Linux/macOS, these are stored at
~/.android/adbkeyand~/.android/adbkey.pub. On Windows, checkC:\Users\<username>\.android\. If found, copying these keys to your forensic workstation may allow ADB communication without the on-device trust prompt. - No workaround available. If no existing authorization exists and the device is locked with USB Debugging disabled, a logical extraction via ADB is not possible. Document the limitation and escalate to a file system extraction method (commercial tool with exploit capability) or a bypass tool if available.
Device disconnects mid-extraction. The extraction starts but drops partway through. The tool reports a connection error, or the progress bar freezes.
- Cable and port. Try a different cable and a different USB port. This alone resolves the majority of mid-extraction disconnections.
- Battery level. If the device battery is critically low, it may enter a power-saving state that disables USB data. Charge the device to at least 50% before attempting extraction.
- Screen timeout. On some Android devices, the screen locking during extraction can interrupt ADB communication. If you have screen access, set the display timeout to the maximum duration or enable "Stay Awake While Charging" in Developer Options.
- Tool conflict. If multiple forensic tools are installed on the same workstation, their USB drivers may conflict. Close all other forensic applications and their background services before attempting extraction.
iOS Connection Issues
Device not appearing in forensic tool. The iPhone is connected but the tool does not detect it.
- Cable certification. iOS devices are notoriously sensitive to cable quality. Use an Apple-certified (MFi) Lightning or USB-C cable. Non-certified cables may charge the device but fail to establish a data connection.
- Apple software interference. If iTunes (Windows) or Finder (macOS) is running, it may claim exclusive control of the USB connection, blocking the forensic tool. Close iTunes, Finder, and all Apple background services (AppleMobileDeviceService, usbmuxd) before connecting the device to your forensic tool.
- USB Restricted Mode. If the device has been locked for more than one hour, the USB data connection is disabled. There is no workaround short of entering the passcode. Document this in your notes and escalate if the passcode is unavailable.
Trust prompt not appearing. The device is connected and unlocked, but the "Trust This Computer?" dialog never shows.
- Previous trust revocation. The user may have previously tapped "Don't Trust" for this workstation, or trusted computers may have been reset (Settings > General > Transfer or Reset iPhone > Reset > Reset Location & Privacy). Disconnect, reboot the device, reconnect, and the prompt should reappear.
- Existing pairing record. If the device was previously paired with this workstation, the trust prompt will not appear because trust is already established. The tool should be able to connect normally. If it cannot, the pairing record may be corrupted. Delete the pairing record from
/var/db/lockdown/(macOS) orC:\ProgramData\Apple\Lockdown\(Windows) and reconnect.
Backup password unknown. The user previously set an iTunes backup encryption password, and neither the user nor the investigator knows it.
- iOS 11 and later. The backup password can be reset from the device itself: Settings > General > Transfer or Reset iPhone > Reset > Reset All Settings. This removes the backup password without erasing user data. The device must be unlocked to perform this action.
- iOS 10 and earlier. The backup password cannot be reset from the device. If the password is unknown, you cannot create an encrypted backup. An unencrypted backup is still possible but will exclude Keychain, Health data, and other categories documented in Chapter 11.
Universal Troubleshooting
Regardless of platform, certain issues affect all extractions:
- Workstation USB ports. If multiple ports fail, try a different workstation entirely. Port controller failures are more common than most examiners realize.
- Virtual machine passthrough. If your forensic tools run inside a virtual machine, USB passthrough must be configured correctly. VirtualBox and VMware handle USB differently, and passthrough failures are a frequent source of "device not detected" errors.
- Antivirus and endpoint protection. Enterprise security software on the forensic workstation may block the deployment of forensic agents to Android devices. Temporarily disable endpoint protection during extraction if your lab policy permits, and document this action.
Connection Troubleshooting Quick-Reference
| Symptom | Platform | Likely Cause | Resolution |
|---|---|---|---|
| Device not detected at all | Both | Bad cable or charge-only cable | Replace with known data cable |
| Device detected but no data | Android | USB mode set to "Charging Only" | Change to MTP/PTP in notification shade |
| Device detected but no data | iOS | USB Restricted Mode active | Enter passcode to unlock |
| Trust prompt not appearing | Android | USB Debugging disabled | Enable in Developer Options (requires unlock) |
| Trust prompt not appearing | iOS | Previous "Don't Trust" or corrupted pairing | Reboot device; delete pairing record on workstation |
| Tool connects then disconnects | Both | Screen timeout during extraction | Extend display timeout; enable Stay Awake |
| Extraction starts but stalls | Both | Low battery or cable issue | Charge to 50%+; try different cable/port |
| Backup password required | iOS | User set encryption password | Reset via Settings (iOS 11+) or accept unencrypted |
| Tool reports "unsupported device" | Both | Outdated tool version | Update forensic tool to latest release |
| Agent fails to deploy | Android | Antivirus blocking agent APK | Temporarily disable AV; document the action |
12.4 Handling Partial and Failed Extractions
A completed extraction that is missing data can be more dangerous than a failed extraction. A failed extraction is obvious: the tool throws an error, and the examiner knows to try again. A partial extraction looks successful on the surface but contains gaps that may not be apparent until deep analysis, or worse, until the defense expert finds them.
Recognizing a Partial Extraction
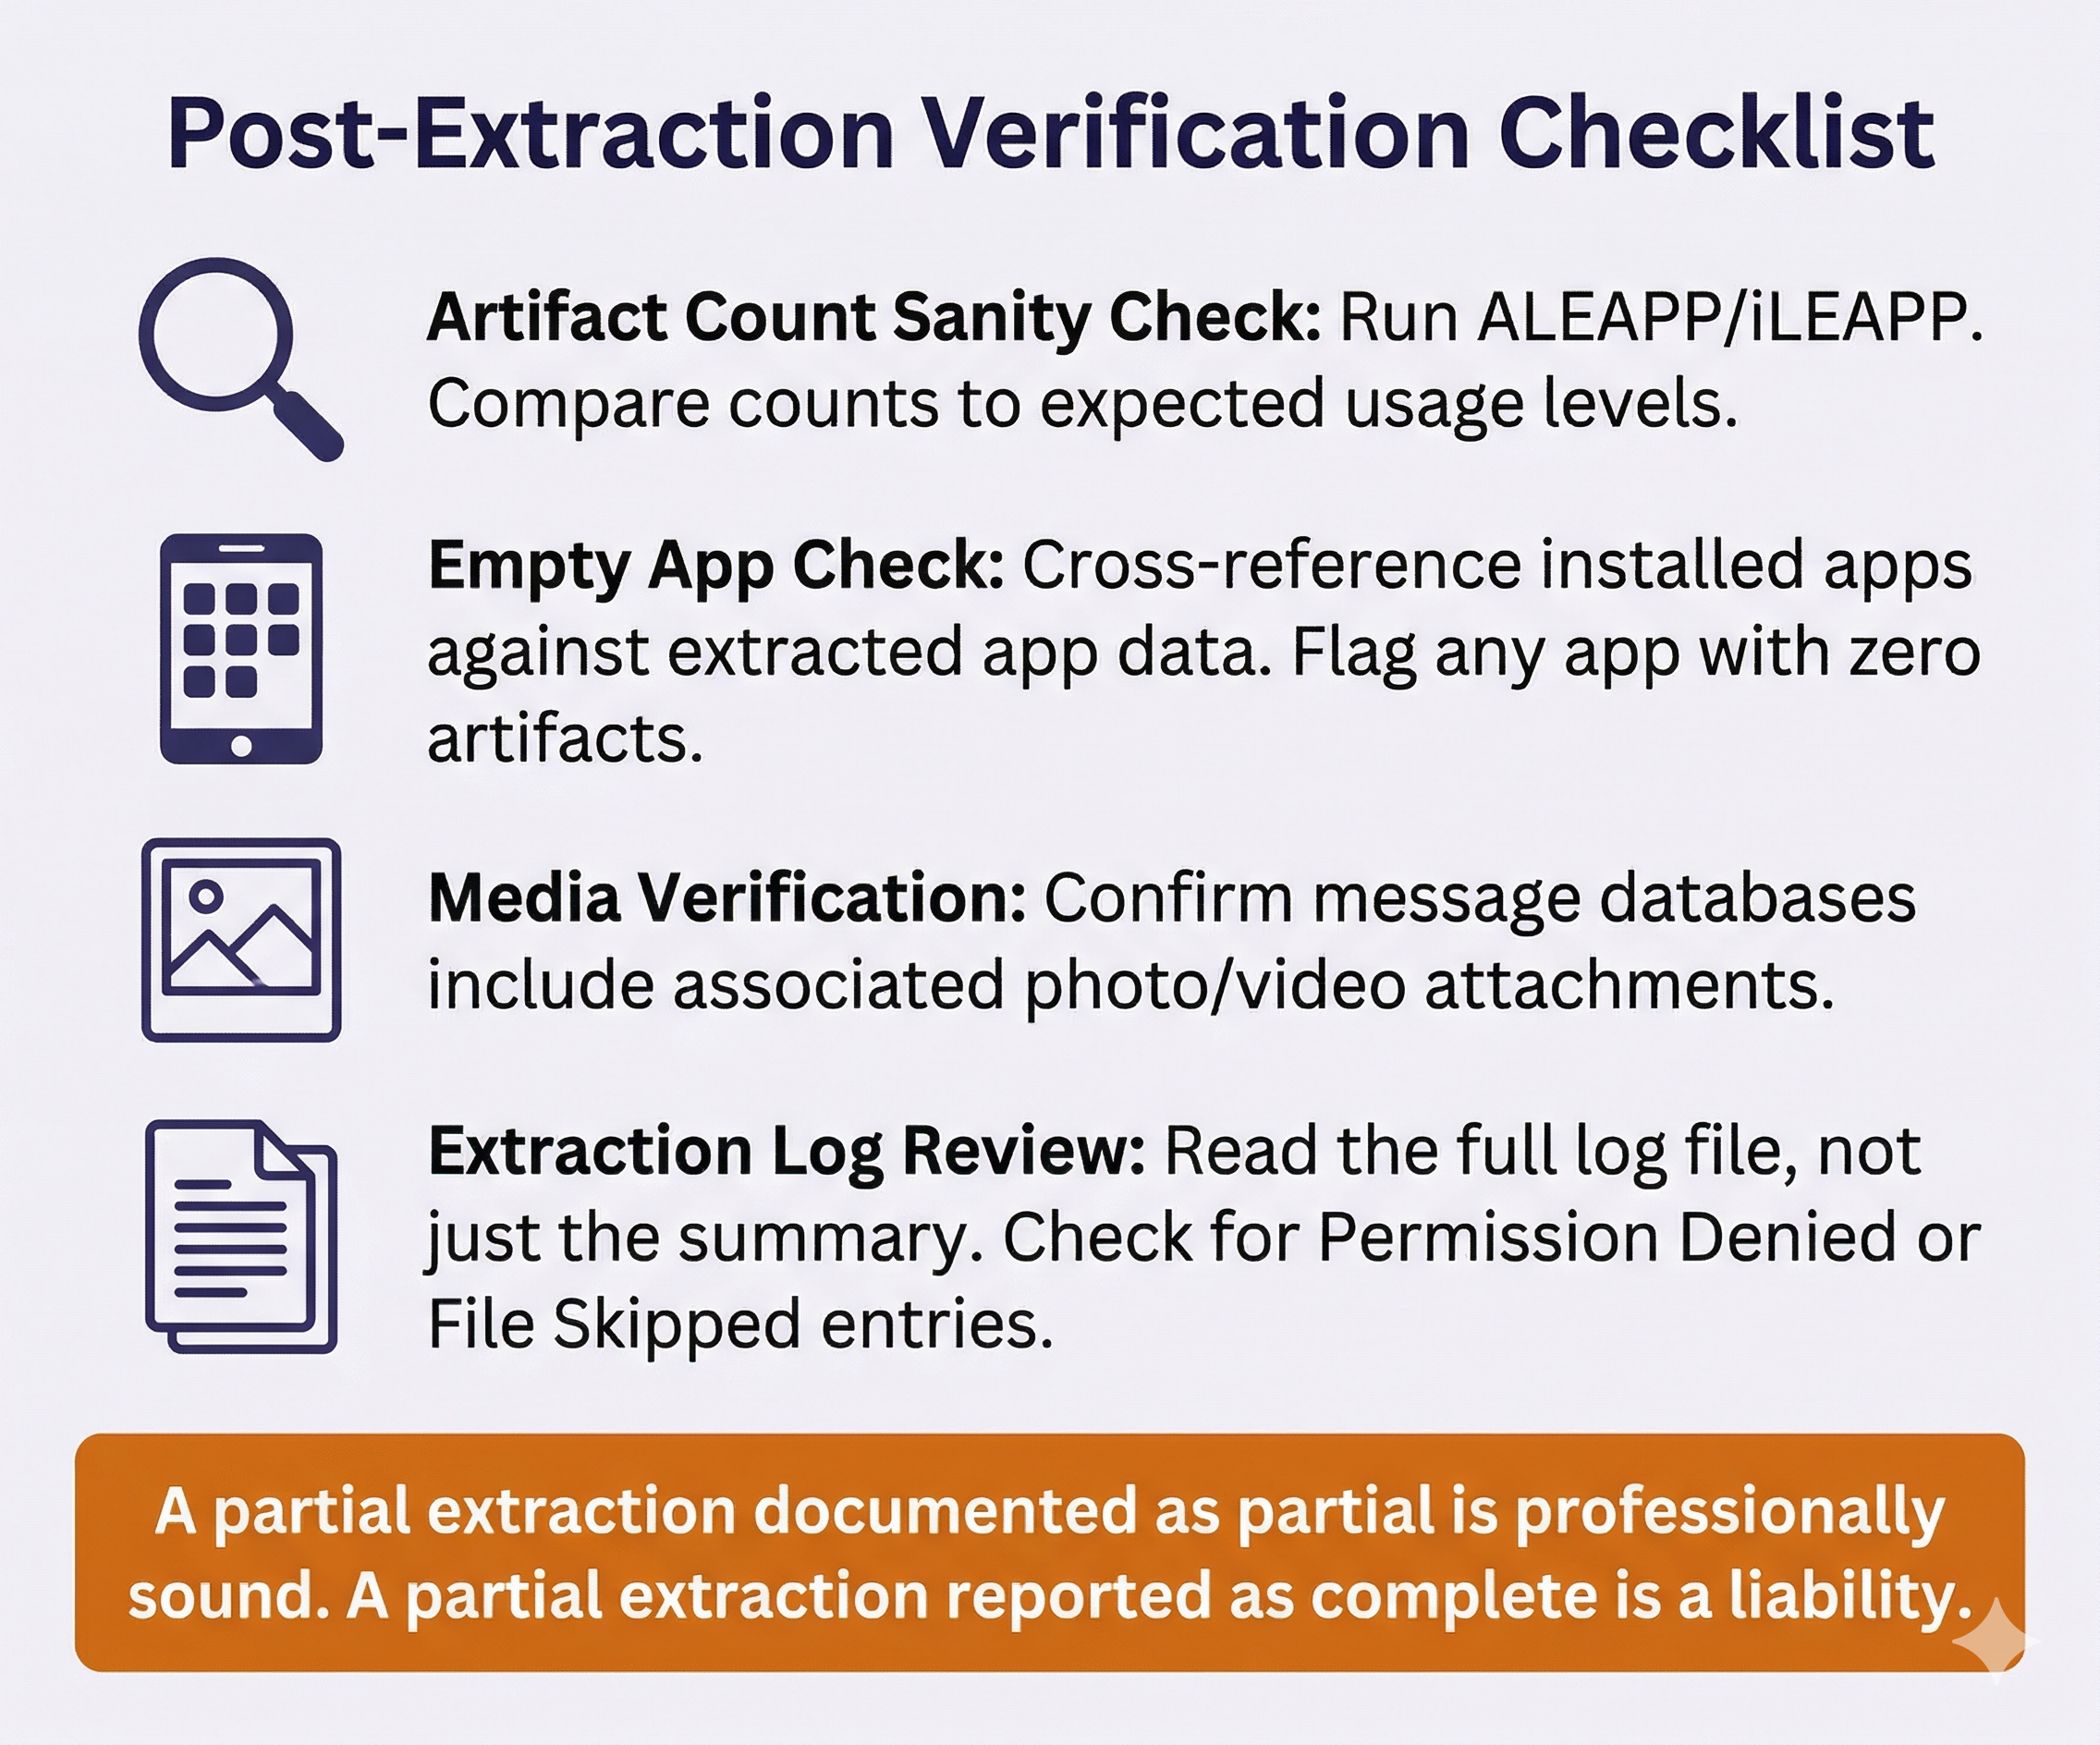
Artifact count sanity check. After every extraction, run the output through ALEAPP (Android) or iLEAPP (iOS) and review the artifact counts. A device used daily for six months should have hundreds or thousands of SMS messages, hundreds of call log entries, and thousands of browser history items. If any major category shows zero or an unusually low count, investigate.
Empty application data. One of the most common partial extraction indicators is an installed app that returns zero data. The extraction report shows WhatsApp, Signal, or Telegram is installed on the device, but the message databases are empty. This does not mean the user never used the app. Logical extractions frequently cannot access encrypted messaging app data because these apps store their databases in sandboxed, encrypted directories that the logical extraction protocol cannot reach.
Missing media. The extraction includes message databases but no photo or video attachments. This can occur when the extraction method captures database files but skips the associated media storage directories due to size limitations or timeout issues.
Tool error log entries. Always read the extraction log file, not just the summary screen. Tools may report "Extraction Complete" while the log contains dozens of "Permission Denied" or "File Skipped" entries for specific directories.
Common Causes of Partial Extractions
- Device disconnection. The cable was bumped, the device ran out of battery, or the screen locked and interrupted the USB session. This is the most common cause and the most preventable.
- Storage limitations. The forensic workstation ran out of disk space during extraction. Always verify that the workstation has at least twice the device's reported storage capacity available before starting.
- Encryption boundaries. The device is in an AFU state, but certain files are protected by stricter Data Protection classes (iOS) or are in sandboxed directories that the logical method cannot reach (both platforms).
- Tool limitations. The forensic tool does not support the specific iOS or Android version running on the device. Tool vendors release updates after each major OS release, but there is always a gap period.
- App-level encryption. Some messaging apps implement their own encryption layer on top of the OS-level protection. Signal, for example, encrypts its local database with a key that is not accessible through standard logical extraction on either platform.
Recovery Strategies
- Re-attempt with the same tool. Ensure the cable and port are solid. Charge the device fully. Extend the screen timeout. Disable any VPN or proxy on the device. Try again.
- Try an alternative tool. If Cellebrite fails, try AXIOM. If AXIOM fails, try the open-source path (ADB + ALEAPP for Android, libimobiledevice + iLEAPP for iOS). Different tools use different extraction protocols and may succeed where others fail.
- Targeted re-extraction. Some tools allow you to extract specific data categories rather than performing a full extraction. If the initial extraction recovered everything except photos, attempt a targeted photo extraction rather than repeating the entire process.
- Escalate the extraction method. If the logical extraction is consistently missing critical data, this is the point where you justify escalating to a file system extraction. Document the logical extraction results, identify the specific gaps, and articulate why a deeper method is necessary. This documentation supports the technical justification section of your report and may be needed to support a request for additional tool authorization.
Warning
A partial extraction that is not documented as partial is a professional liability. If the defense's forensic expert re-examines the device and recovers data that your extraction missed, and your report did not acknowledge the gap, your credibility is severely damaged. Always document what was recovered, what was not recovered, and why. A transparent report that says "the logical extraction did not recover Signal messages due to app-level encryption" is professionally sound. A report that silently omits Signal data is not.
Putting It Together
Scenario: The Incomplete Extraction
Examiner Reyes receives a Samsung Galaxy S23 in a fraud investigation. The device is unlocked with USB Debugging enabled. She connects it to her forensic workstation, selects a logical extraction in Cellebrite UFED, and the tool reports "Extraction Complete" after 18 minutes.
Before beginning analysis, Reyes opens the extraction in ALEAPP and reviews the artifact summary. SMS messages: 2,847. Call logs: 612. Browser history: 4,210. So far, the numbers look reasonable for a device that has been in use for over a year. Then she checks application data. The device has WhatsApp, Telegram, and Signal installed. WhatsApp returned 0 messages. Telegram returned 0 messages. Signal returned 0 messages.
Reyes checks the extraction log. She finds 14 "Permission Denied" entries, all pointing to the sandboxed data directories for those three messaging apps. The logical extraction protocol could not access the encrypted databases.
She documents the finding: "Logical extraction completed successfully for native device data (SMS, call history, browser, contacts, media). Three installed messaging applications (WhatsApp, Telegram, Signal) returned zero artifacts due to application-level sandboxing and encryption that the logical protocol cannot access. Recommend escalation to file system extraction to recover messaging application databases."
Reyes then re-attempts with AXIOM as an alternative tool. AXIOM's advanced logical method recovers a partial WhatsApp database (messages but no media attachments) but returns the same zero results for Signal and Telegram. She documents the AXIOM results alongside the Cellebrite results, notes the specific gaps that remain, and submits her escalation recommendation with both extraction attempts as supporting evidence.
This scenario illustrates the full diagnostic workflow: extract, verify artifact counts, check the log, attempt recovery with an alternative tool, and document every finding at each step before escalating.
12.5 Extraction Verification and Integrity
Every extraction must be verified for completeness and integrity before analysis begins. This is not optional. It is a requirement for forensic soundness and court admissibility.
Hash Verification
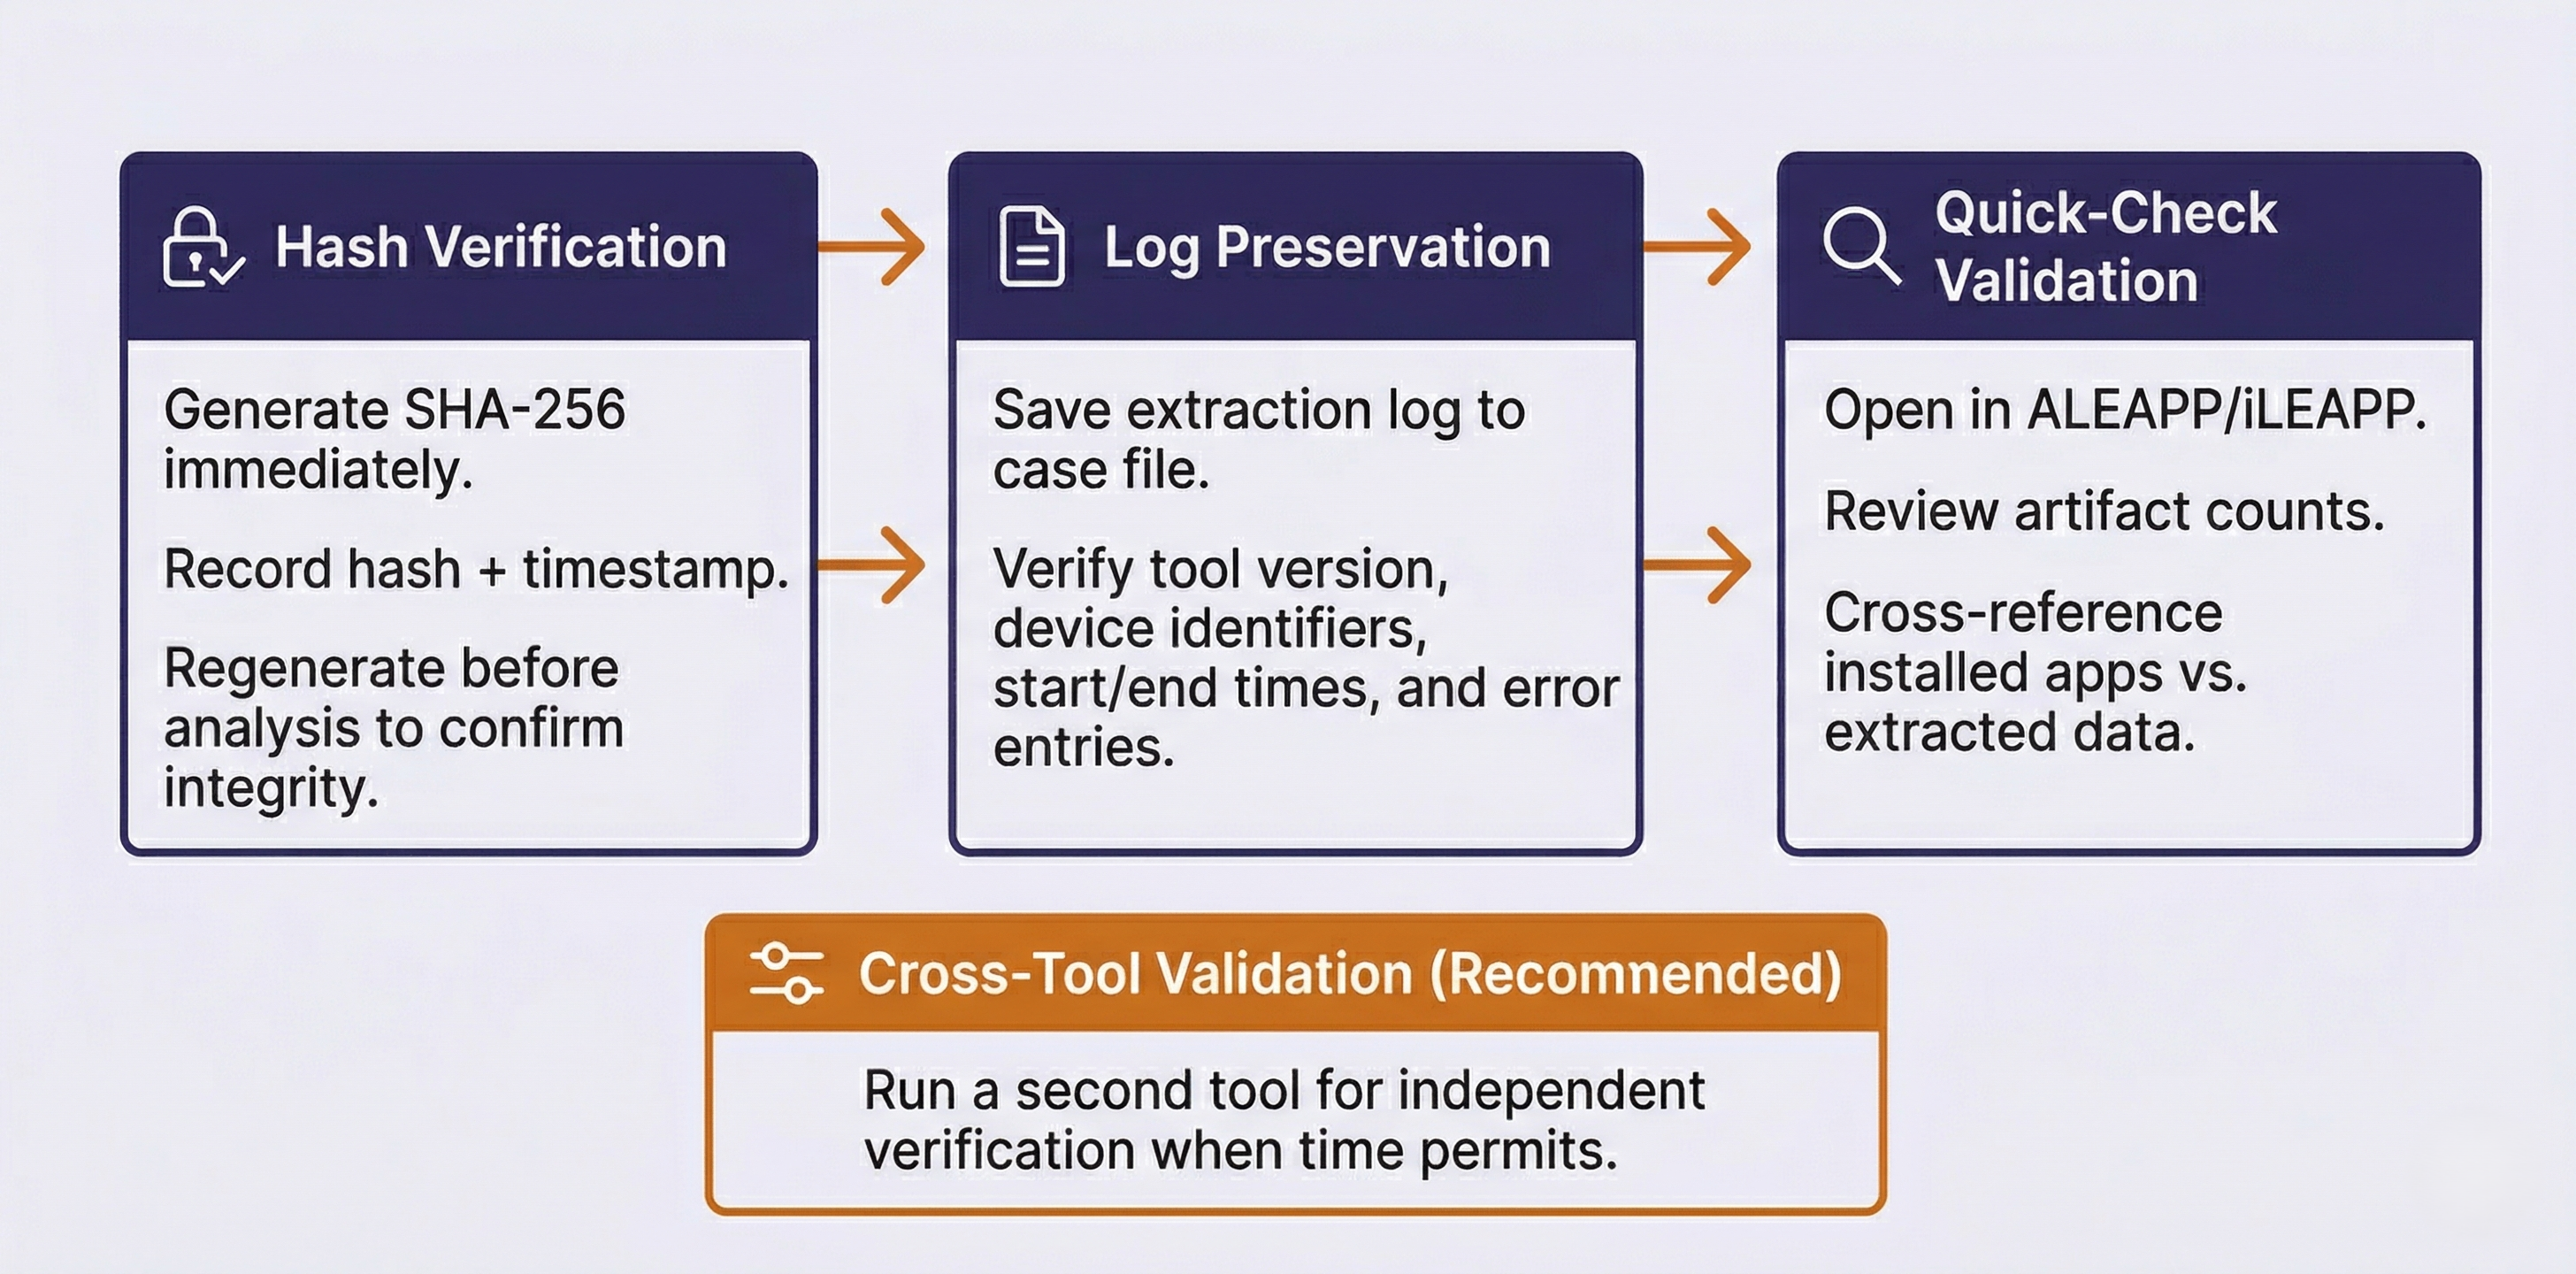
Immediately upon extraction completion, generate cryptographic hash values of the extraction output:
- SHA-256 is the current standard for forensic integrity verification. Generate a SHA-256 hash of the extraction file (or the top-level directory if the extraction is a folder structure).
- MD5 may be generated as a secondary hash for backward compatibility with older systems, but should never be the sole integrity verification method.
- Record these hash values in your examiner notes with the date and time of generation. Before beginning analysis, which may be hours, days, or weeks later, regenerate the hashes and compare. If they match, the extraction has not been altered since it was created.
Extraction Log Preservation
Every commercial forensic tool generates a detailed log file during extraction. This log documents:
- The exact tool name and version (e.g., "Cellebrite UFED 4PC, Version 7.68.0.23").
- The device serial number, IMEI, and model as detected by the tool.
- The connection timestamp (when the device was detected).
- The extraction type selected (Logical, Advanced Logical, File System).
- Start and end timestamps of the extraction.
- Any errors, warnings, or skipped items encountered during extraction.
Save this log file as part of your case file. It may be requested during discovery or cross-examination. If asked in court "What tool did you use and how do you know the extraction was complete?", the log file is your answer.
Quick-Check Validation
Before investing hours in manual analysis, run a quick validation pass:
- Open the extraction in ALEAPP (Android) or iLEAPP (iOS).
- Review the artifact category counts in the generated report.
- Confirm that expected categories contain reasonable data volumes.
- Cross-reference: if the device has WhatsApp installed (visible in the app list), does the extraction contain WhatsApp data? If not, document the gap.
This five-minute check can save hours of analysis on a flawed extraction that needs to be re-performed.
Cross-Tool Validation
Analyst Perspective
Some forensic labs and agencies require dual-tool verification as a standard operating procedure. Even when it is not required by policy, running a second extraction with a different tool provides an independent check on the first tool's results. If both tools return the same artifact counts and data, confidence in the extraction is high. If the second tool recovers artifacts that the first missed, you have identified a gap that would have gone undetected with a single-tool approach. The time investment is modest (most logical extractions complete in under 30 minutes), and the benefit to your report's defensibility is significant. When time permits, make dual-tool extraction a standard part of your workflow rather than a troubleshooting step reserved for problem cases.
12.6 The Escalation Decision Framework
One of the most important professional judgments a forensic examiner makes is recognizing when a logical extraction is insufficient. Escalating to a file system or physical extraction method involves additional time, may require specialized tools, and sometimes requires additional legal authorization. The decision must be justified and documented.
When Logical Is Sufficient
A logical extraction is appropriate when:
- The investigation scope is narrow and well-defined (e.g., "recover text messages between the suspect and victim between January 1 and March 15").
- The device is cooperative: unlocked, paired, and the user data is accessible through standard backup protocols.
- Time pressure is high and a rapid triage is needed before a deeper extraction can be scheduled.
- The warrant scope is limited to data categories that logical extraction reliably captures (messages, contacts, call history, photos).
When to Escalate
A file system or advanced extraction is warranted when:
- Deleted data is suspected. Logical extractions recover only active data. If the investigation involves deleted messages, recently cleared browser history, or removed photos, a file system extraction is necessary to access database free pages and unallocated space.
- App databases are empty in the logical extraction. This is the "empty app" problem described in Section 12.4. If the investigation hinges on WhatsApp, Signal, or Telegram messages and the logical extraction returned nothing, escalation is the path to that data.
- iOS-unique artifacts are needed. KnowledgeC, Significant Locations, and certain location caches are only accessible through file system extractions and are never included in any backup type (Chapter 11).
- App-level analysis is required. If the investigation involves analyzing an APK for malicious behavior (Chapter 10), the APK must be pulled from the file system.
- The logical extraction is inconsistent. If the logical extraction data contradicts other case evidence (e.g., the suspect's call history shows no calls on a date when carrier CDRs confirm multiple calls), the logical extraction may be incomplete, and a deeper method may recover the missing records.
When to Escalate to Physical or Advanced Methods
- The device is locked and no bypass is available through logical or file system methods.
- The device will not boot normally but the storage is intact (physical damage cases).
- The investigation requires recovery of data from unallocated space beyond what file system extraction provides.
- The device uses legacy encryption (older Android FDE) where a physical image combined with the credential yields full access.
Documenting the Escalation
When escalating, your report should include:
- A description of the initial logical extraction attempt and its results.
- The specific data gap or limitation that prompted escalation.
- The technical justification for why a deeper method is expected to recover the missing data.
- The method selected for the escalated extraction and why.
This documentation protects you legally (demonstrating that the more invasive method was necessary, not arbitrary) and professionally (showing a methodical, reasoned approach rather than jumping to the most aggressive technique by default).
Putting It Together
Scenario: Justifying an Escalation
Examiner Davis is working a child exploitation case involving an iPhone 14 Pro running iOS 17.4. The device is unlocked and paired with the forensic workstation. Davis performs a logical extraction using Cellebrite UFED, generating an encrypted iTunes-style backup.
The extraction completes and the initial ALEAPP/iLEAPP validation shows strong artifact counts for SMS/iMessage (5,200 messages), call logs (890 entries), Safari history (3,400 records), and photos (12,000 items). On the surface, this looks like a thorough extraction.
However, the case agent has specifically requested analysis of the suspect's location history and app usage patterns over a six-month period. Davis checks the extraction for KnowledgeC data (the iOS database that records application usage, device states, and interaction patterns) and Significant Locations. Neither artifact is present. This is expected: KnowledgeC and Significant Locations are stored outside the iTunes backup boundary and are only accessible through file system extraction methods (Chapter 11).
Davis also notes that the suspect has the Wickr Me app installed, but the extraction contains zero Wickr messages. Like Signal, Wickr uses application-level encryption that places its database beyond the reach of logical extraction.
Davis prepares the escalation documentation:
- Initial extraction results: "Logical (encrypted backup) extraction completed successfully. Strong artifact recovery for SMS/iMessage, call history, Safari, and media. Extraction hash: [SHA-256 value]. Extraction log preserved as Case_2024-0847_ExtractionLog_01.txt."
- Identified gaps: "KnowledgeC database not present in extraction (expected limitation of backup-based logical method). Significant Locations not present. Wickr Me messaging database returned zero artifacts despite confirmed app installation."
- Technical justification: "KnowledgeC and Significant Locations are stored in /private/var/mobile/Library/ paths that are excluded from iTunes-style backups by design. Recovery of these artifacts requires file system-level access. Wickr Me stores its encrypted database in a sandboxed container that is not accessible through the backup protocol. A file system extraction using an agent-based or exploit-based method is expected to recover these artifacts."
- Method selected: "Recommend file system extraction using Cellebrite Premium/GrayKey (pending tool availability and supervisor authorization)."
The escalation request is approved, and the file system extraction recovers the KnowledgeC database, Significant Locations data, and the Wickr database (which still requires decryption using a method outside the scope of this chapter). Davis documents both extractions in the final report, showing the logical extraction as the initial method and the file system extraction as the justified escalation.
This scenario demonstrates the complete decision cycle: extract, validate, identify specific gaps, justify escalation with technical reasoning, document every step, and maintain parallel records of both extraction attempts.
Chapter 12 Summary
- Manual examination is a distinct skill required for unsupported devices, consent-limited investigations, and validation. It is not simply a fallback. Documentation standards (photography, video, examiner notes) determine whether manual evidence is court-admissible.
- Logical acquisition follows a structured workflow on both Android and iOS. The critical steps are device identification, trust/pairing establishment, extraction, verification, and hash generation. Every step must be documented, including chain of custody updates at each device state change.
- Connection failures are the most common problem in mobile forensics. Cable quality, USB port selection, driver conflicts, USB mode settings (Android), and USB Restricted Mode (iOS) account for the majority of "device not detected" issues. A systematic troubleshooting approach resolves most failures in minutes.
- Partial extractions are more dangerous than failed extractions because they look complete on the surface. Always verify artifact counts against expectations. The "empty app" problem, where installed apps return zero data in logical extractions, is the most common indicator that escalation is needed.
- Extraction verification requires SHA-256 hashing immediately upon completion, extraction log preservation, and a quick-check validation pass using ALEAPP or iLEAPP before beginning analysis. Cross-tool validation using a second forensic tool adds an independent integrity check.
- The escalation decision must be justified and documented. Logical extraction is sufficient for narrow-scope investigations with cooperative devices. Escalation to file system extraction is warranted when deleted data, app-level data, or iOS-unique artifacts (KnowledgeC, Significant Locations) are needed. The escalation documentation protects both the examiner and the investigation.
Next Steps: With the practical skills of examination, troubleshooting, and escalation covered, Chapter 13 turns to the evidence that increasingly drives modern investigations: third-party application artifacts. Messaging apps, social media platforms, cloud-synced data, and communication tools that span both Android and iOS create a rich evidentiary landscape that requires its own analytical framework.